Remaking, or Customizing, is the process of taking a factory
original-finish model, and through the use of heat or other methods,
altering the position and physical shape. Other aspects of
customizing can include adding and resculpting of muscles,
refining/resculpting heads, the addition of details such as veins and
genitals, the carving of ears and hooves, the addition of a hair or
sculpted mane and tail, or any other of an infinite variety of improvements.
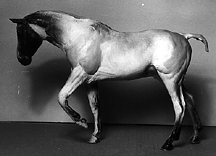
The most popular models for remaking are the Breyer horses. This is because of their great detail and realism, plus the plastic they are made from (cellulose acetate) is easily softened and bent, as opposed to harder, more brittle plastics such as styrene. The new Breyer Stablemates are made from a harder plastic that is more difficult to remake, and will not be covered here.
Other models can be used as well. The relatively new Peter Stone models work very well. Many of the Hartland/Hartland Collectibles can be used as they are also made of the softer plastic. Some artists have even perfected methods for repositioning/remaking models made of resin and ceramic.
Once you have decided upon a model, you must decide what position you want to remake it into. Sometimes it's just as easy to decide upon a position and THEN find a model that will suit that position. Something I tend to do is find a model of the proper breed/type that is in a similar/easily attainable position to the remake I plan to work on. Say you want a cantering stock horse. A simple remake is to use the Breyer Stock Horse Stallion which is in a walking position, and to simply move the foreleg on the ground forward, and you can have a passable canter. Of course a lot more things need to be done, like move the shoulder forward as well as the leg, plus the head/neck should be lowered, plus the hind legs really should be moved further apart, but you get the idea!
If you're more adventurous, it's fun to take a standing model and
move all four legs into that canter, but for beginners, it's best to
keep it simple. If you start out with too big a project, the
less-than-perfect results can be discouraging. Remember, you have to
crawl before you can walk!
First thing to do before starting is to take a straight pin and heat
it over a flame. Pierce a small airhole in an inconspicuous spot on
the model, like between the forelegs or hind legs. This will provide
a vent for any heated air inside the model to escape. Otherwise
bloating or explosion could result. It's a good idea to provide some
sort of vent hole on the model even when it is finished, to allow for
the expansion/contraction of the air inside the mold. You might also
want to take this time to take a file and file down the molding seams
that are often found on the legs and head of most models. Sanding
will help smooth things down even more. Some people take this time to
remove the molded on mane and tail, but if remaking is going to be
extreme, this is not necessary as they will be destroyed in the
process. You can also hollow out the ears and carve out the hooves at
this time as well.
Assuming we're using a heat gun, hold the neck/head area about 6" above the gun, in the blast of hot air...carefully move the area to be bent back and forth over the heat source, careful not to heat up the actual head itself (this can result in a deformed head!). I usually allow a little extra heating along the crest of the neck as the plastic is thicker here. After a few seconds, test the bend to see if the plastic has softened. CAREFUL: IT'S HOT!! Return the model to the heat repeatedly until it is soft, and carefully, slowly bend the neck where you want it. Depending on the severity of the bend, buckling/warping of the plastic will occur. This is not a problem, I generally end up smooshing the buckled plastic inwards, and resculpt the neck entirely.
Once you have the position you want, holding the model in position, run it under a stream of cold water. This will cool the plastic and set the pose! Dry with a towel, and if you think it needs more adjusting, back to the heat gun!
The technique is the same for using a candle or a blow drier. For boiling water, it will be trickier because you will have to immerse the entire head/neck into a pot of boiling water, and therefore the head will become soft and could collapse.
One nice thing about the plastic when it gets heated and soft is that
it also becomes stretchy...with care you can actually stretch
out/extend the neck/head to get proper proportion! Try it, it's FUN!
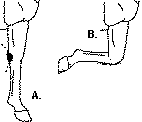
Using the same technique as for head, hold the joint to be bent over the heat source, moving it back and forth slowly until softened. Carefully bend the leg a bit at a time, repeating the heating as often as necessary. Again, once the pose is reached, run under cold water to set it. If the bend is extreme, you may want to use a coping saw/craft saw to saw out a little wedge of plastic on the inside of the potential bend to help it bend easier (Fig. A & B)...otherwise that excess plastic can buckle and have to be filed out later.
This technique will work for bending hocks and fetlocks, but when you get up into knees and elbows, you may have to play it by ear. The plastic is thicker at the knee & elbow, so it will take more heating, and there is a greater possiblity of plastic collapsing. To tuck the forearm up to the chest at the elbow you may have to remove some of the plastic first (using the wedge method described above).
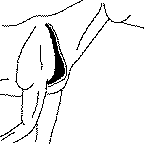
In order to move an entire shoulder or hip, a bit more is involved.
This is necessary to attain a realistic look to your custom. The
extra work will be worth it! I like to heat the entire shoulder area,
and when it is soft, use an X-Acto knife (or sharp knife) to cut
behind the shoulder and along the top of the shoulder, careful to
leave some plastic at the withers for an anchor. Then the shoulder
can be moved forward or backwards as needed. Once this cools, it's a
simple matter to stuff the resulting cavity with crumpled newspaper
or aluminum foil, and begin filling the gaps. This is where Bondo
excells! Occasionally a leg/shoulder (or head!) will have to be
reattached by being wired on. I do this by burning a few small holes
along the edge of the shoulder and corresponding holes on the body,
and "sew" the parts together with fine wire, then apply
Bondo or other filler.
By this stage your model is a worthless mess! Only YOU can save it
and make it something of beauty! If there are large gaps/chunks
missing, I will fill them with Bondo. Once that sets, a rough
file-down job, and then bring in the Epoxy Putty to further refine
the fill and resculpt any missing muscles/details. When that has
dried to my satisfaction, I will go over it with the latex wood
filler to apply a bit more fine sculpting and to smooth over rough
spots/holes/dents. When that has dried, I will sand it, then apply
more filler to take care of the rough spots that have appeared. This
process is repeated until I think I've got it smooth, then I will
paint the entire model with white gesso (or give it a coat of matte
white spray enamel). This helps all the imperfections to appear, and
more touch-ups are done with the wood filler. When the thing is
finally smooth, I give it one final coat of gesso/primer, and he's
ready to paint!